
Diesmal habe ich einen Zopf probiert der im Moment wirklich in aller Munde ist. Ich habe ihn zigfach auf Instagram gesehen und auf Youtube hat gefühlt jeder Haarkanal eine Anleitung dazu. Das werde ich mir darum definitiv sparen. Auch weil ich finde, dass das Prinzip soo simpel ist, dass es nur einer kurzen Erklärung bedarf. Sofern man bereits Holländisch flechten kann.
Es geht um eine Möglichkeit an sich selbst einen sogenannten Mermaidbraid zu flechten. Das heißt man flechtet normal einen französischen Zopf zu dem man immer nur wenig Haar hinzu nimmt und das auch noch sehr locker. So weit so gut. Das locker hinzunehmen geht nur kurz am eigenen Kopf. Muss man den Zopf nach vorne über die Schulter nehmen wird es zu 99% schief. Diese Zöpfe sind aber schön romantisch und verspielt, viele Leute mögen sie sehr. Was macht man also? Eine Zofe hat man für gewöhnlich nicht jeden Morgen zur Hand.
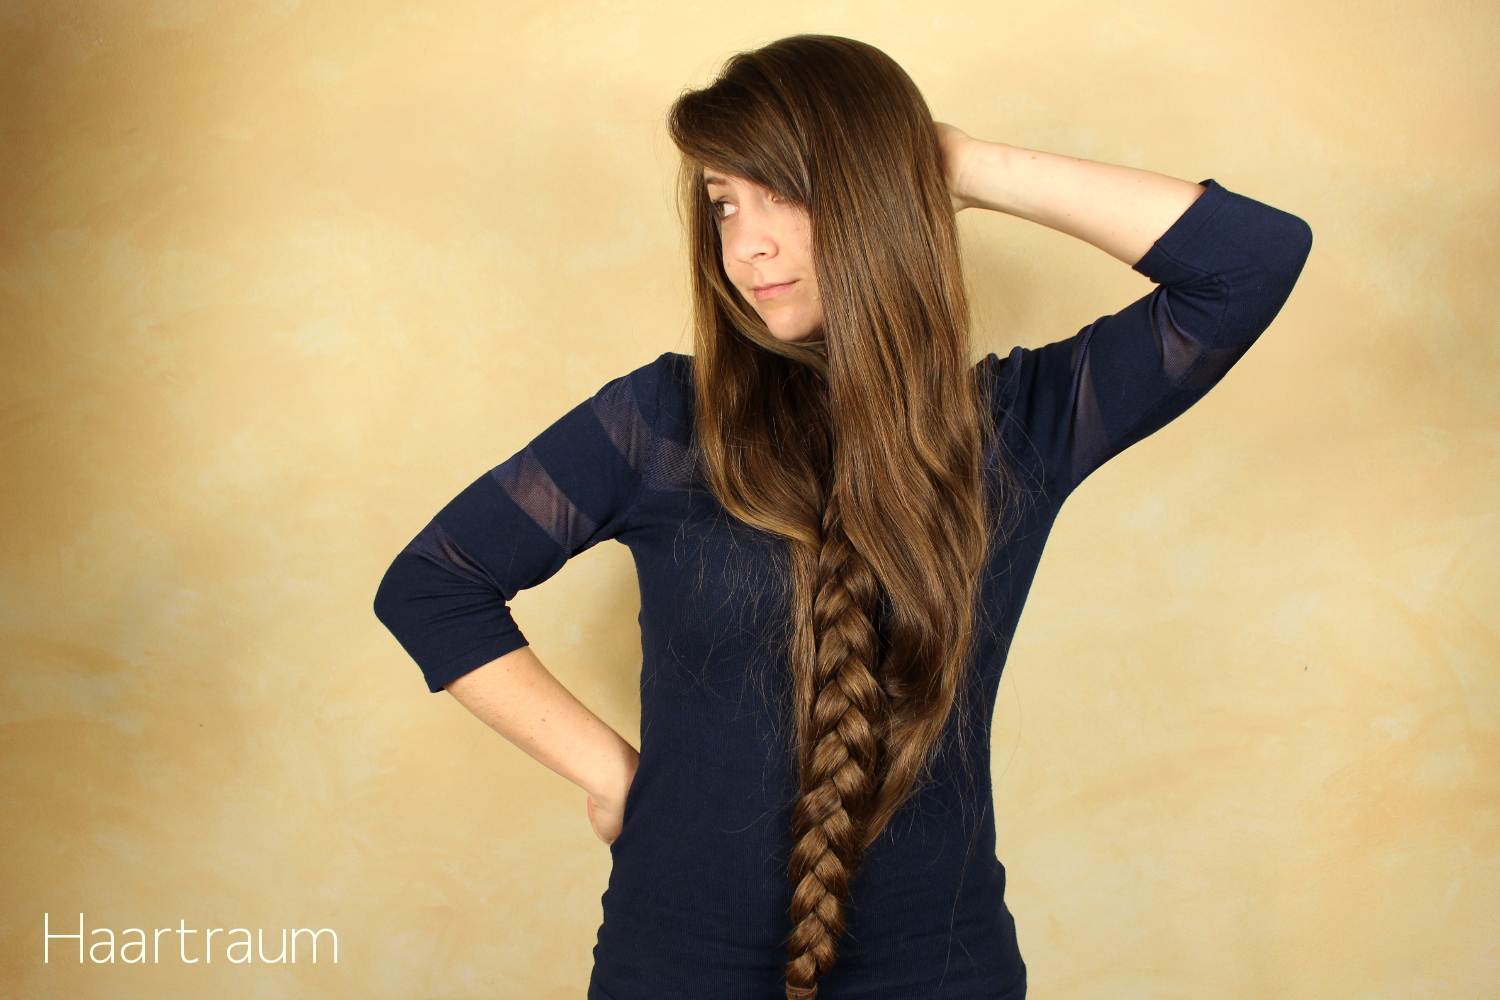
Man flechtet sich einen Bart. Sozusagen. Ich fand den ersten Schritt wirklich spaßig, darum gibt es dazu auch ein nicht ganz ernstes Foto.
This time I’ve tried a braid you can find anywhere right now. I’ve seen it a thousand times on Instagram and almost every hair related channel has a video tutorial on Youtube. This is why I won’t do one. And because I think it’s easy enough that you can do it with a short description. At least if you know how to dutch braid.
It’s a way to do a so called mermaid braid on yourself. Usually you do this by doing some kind of french braid with loosely added strands. If you’re doing it on your own head you can’t reach really far down without taking the braid to the front. But if you do so it usually goes wrong. But those braids are really romantic and many people like them. So what to do if you’re not having someone to braid your hair (and we usually don’t).
You braid yourself a beard. I really had fun doing this first step as you might see on the picture below.
Zuerst braucht man zwei Strähnen von oberhalb der Ohren. Damit fängt man an holländisch zu flechten und nimmt in jeder Runde kleine Strähnen dazu. Dabei muss man die Haare so einteilen, dass in jeder Runde möglichst gleich viel dazu kommt und die Haare am Besten genau bis zum Ende vom Zopf reichen. Aber warum holländisch? Das sieht doch selten dämlich aus. Die Lösung kommt im nächsten Schritt – man flippt den Zopf einmal über den Kopf nach hinten.
Tadaa, ein Mermaid Braid. Mein allererster Selbstversuch. Wie ihr seht funktioniert es bis etwa BH-Verschluss Höhe ganz gut, darunter hätte ich wahrscheinlich strammer dazu nehmen müssen. Die Flechtwellen die ich noch hatte waren sicherlich auch nicht besonders hilfreich für dich Optik. Trotzdem finde ich den Zopf ganz cool, auch wenn es beim letzten Versuch (da hat Zoey so einen an mir geflochten) so aussah als wären meine Haare zu glatt/ rutschig und schwer. Der Zopf hatte sich da schon nach kurzem in die Länge gezogen und den Effekt zerstört. Aber immerhin Fotohübsch ist er.
Hat noch jemand diese Technik mal ausprobiert? Wart ihr mit euren Ergebnissen zufrieden? Ich war es wie man vielleicht merkt nicht ganz, auch weil er recht tief ansetzt und ich das von vorne nicht so optimal fand. Vielleicht müsste man nicht unter dem Kinn sondern vor der Nase anfangen zu flechten? Zusätzlich wird der Hauptzopf zum Ende hin recht dick, was wie ich finde die Optik auch etwas stört. Wahrscheinlich müsste ich nach unten hin deutlich dickere Strähnen hinzunehmen, aber ob es dann noch für die ganze Länge reicht? Wer weiß, möglicherweise lass ich es nochmal auf einen Versuch ankommen.
First you need two strands from above your ears. With those you start a dutch braid and add tiny strands of hair as you go down. Take care that you don’t take too much hair as it needs to suffice all the way down. But why a dutch braid? Doesn’t this look silly? The solution is the next step – you flip the braid to the back over your head.
A Mermaid Braid! My very first try on myself. As you can see it worked really well until about bra strap height. Below I probably should have added the strands more tightly. And my braidwaves weren’t good for the look either. But I still like the braid somehow. Even thjough the last time I wore a comparable braid (Zoey did it on me) it seemed like my hair was too straight, slippery and heavy. It pulled itself down and destroyed the loose look.
Did anyone else try this technique recently? Were you happy with your result? As you might have noticed I wasn’t really content. The braid starts rather lowon my head. I don’t really like this. Maybe instead of starting to braid below your chin you should start in front of your nose? And the braid in the middle gets rather thick on the way down. I don’t like the look of this, too. Maybe I should add thicker strands at the end, but then I would have to take even less hair in the first rounds. Maybe I will give it another try sometimes,

Ich finde auch diese Frisur extrem hübsch und romantisch.
Hast du dieses Video von Torrinpaige gesehen?
https://www.youtube.com/watch?v=TvT2AsZeUbs
Ich finde es fast noch schöner. Und das Ergebnis ist, dass der Zopf höher anfängt!
lg
martha
Gleich mal angeschaut, das kannte ich nämlich noch nicht. Ich finde aber die Lösung mit den Haarnadeln nur suboptimal. Bin mir fast sicher, dass das nicht lange oben hält, zumindest nicht bei meinen Haaren und ich finde die Optik schöner, wenn die Strähnen nach unten fallen statt wie bei ihr nach oben gezogen werden. Aber es ist auf jeden Fall nochmal eine tolle Variante!
WOW, was für eine tolle Haarpracht. Gefällt mir richtig richtig gut! 🙂
Wie lang sind deine Haare aktuell in cm? Und wie bekommt man sowas gepflegt? Bestimmt sehr aufwendig oder?
LG :*
Mia
Ähm ich kann dir leider keine ganz aktuelle Zahl sagen, vermutlich etwa 120cm SSS. Ich persönlich empfinde die Pflege nicht als aufwändig, man wächst da so langsam rein würde ich sagen. Du findest in der Rubrik „hair care“ einiges dazu 🙂
Ich habs an mir selber auch schon ausprobiert, hab aber den Fehler gemacht, dass ich erst unter dem Kinn zu flechten angefangen hab. Ich fand das Ergebnis zwar hübsch, aber die flach am Oberkopf anliegenden Haare haben mir nicht so gefallen. Außerdem haben die Anfangssträhnen ganz schon gezogen, da das Gewicht des Zopfes quasi an den beiden Strähnen gehangen ist. Ich werd es aber glaub ich noch einmal versuchen (diesmal von der Nase weg), aber bestimmt nicht im Winter zum Rausgehen – halb- oder ganz offene Haare und Schal ergeben bei mir immer eine enorme Dreadlock im Nacken 😉
Ja die Angst vor dem Wuschel im Nacken hält mich auch davon ab, das Ganze länger zu tragen.
Liebe Nessa,
Hab den zopf gestern auch endlich mal probiert. Beim ersten versuch hab ich genau vor der nase angefangen und beim zweiten etwas hoeher vor den Augen. Beides hat ganz gut geklappt, wobei die straenen bei mir am ende fast wie ein zelt ausgeschlagen sind bevor sie im zopf reingingen. Schoener look auf jeden fall und der trick ist auch klasse.
Auf deinen bildern wirkt der zopf fast genauso lang wie ein normal geflochtener englisch, an mir hat er die laenge sehr verkuertzt (von Taille zu APL). Ferndiagnose ist immer schwer aber hast du eine idee warum das passiert sein koennte?
Fuer besondere anlaesse, z.b. mit abendkleid auf jedenfall zu wiederholen. Aber fuer den alltag ist er mir zu locker, da bin ich eher ein stramm flecht mensch 😉
LG
Dagz
Ja ich finde die Frisur auch eher passend zu besonderen Anlässen. Ich denke, dass dein Zopf so viel kürzer ist liegt daran, dass du deutlich weiter oben angefangen hast zu flechten. Bei meinem Versuch habe ich unter dem Kinn angefangen so wie bei den ganzen Videos im Internet. Startest du höher geht der Zopf natürlich nicht so weit nach unten 😉 also das wäre jetzt meine Theorie.